
Free Hand Sketching
Basic Technology J.S.S 1 Third Term
Theme: drawing Practice
Sub-Theme: Tools, Machines and Processes
WEEK 1
Free Hand Sketching
Performance Objectives
Students should be able to:
- Define Free Hand sketching
- Make neat Free Hand sketching of lines, curves and irregular shapes
Content
Free Hand Sketching is used to transfer the idea of an engineer’s abstract world to the real world in 2D and 3D. It is used for daily communication in the engineering world as drawing is the international language of engineering. Freehand drawing is also used to quickly present an idea in a graphical form to non-technical peoples. It improves the communication between all the members of a team and also between the customers. Free Hand Sketching is such a drawing which is drawn without measuring instruments.
This drawing is drawn with the help of pencil and eraser only. Such drawing is drawn before every type of actual drawing because it takes less time. After doing such drawing, it is pondered over, and necessary alterations are made in it if needed. Then the actual drawing is prepared.
Free-Hand Sketching Instruments.
Following instruments are needed for the drawing of freehand sketching.
1. Soft Lead Pencil.
2. Eraser.
3. Sharpener.
4. Drawing Sheet.
5. Graph Sheet.
Importance of FreeHand Sketching.
Freehand drawing has much importance in practical works because a draftsman has to check the drawings of every object from the engineer.
At the checking of complete drawing, much time is wasted on the alterations, if needed.
Since less time is needed for freehand drawing, therefore, initially such drawing should be depended upon.
Principles of FreeHand Sketching.
Following principles should be followed for freehand sketching:
1. The object should be seen thoroughly and pondered over its objectives and concepts.
2. More detailed aspect is considered for selection of a view.
3. Space is specified on a drawing sheet according to the sizes of views.
4. Firstly, the dim lines are drawn so that extra lines may be erased easily.
5. Scale and ruler are not used in drawing, although, ratio and proportion of different parts of an object are considered.
6. Firstly, horizontal lines are drawn then vertical lines are drawn, and arcs and circles are drawn lastly.
7. After completing the diagram, a clear scale is written in some suitable manner.
Sketching of Lines in Free Hand Drawing.
1. Sketching of Straight Lines.
The line is the most important part of freehand drawing as sketching is done by different lines.
Straight lines can be divided into different lines such as oblique, horizontal, and vertical lines.
Drawing straight lines for the first time is a difficult task. Mostly result in curved and arcs. This happens due to the forearm when remaining in the fixed position.
So, when drawing the straight lines, moving your forearm is important. Basically, when drawing horizontal straight lines. The distance between your hand and pencil tip should be 40 mm minimum, and your hand should rest on the edge of the paper. Straight lines are drawn with the thumb and index fingers.
The most important part of sketching straight lines is that your movement should be in a controlled manner. You can also draw oblique lines by just changing the position of your arm. The easiest way to draw long straight lines is by sketching short lines and then connecting it with one another. By doing this, there will be little to no chances of errors.
(i). Sketching of Vertical Lines.
A vertical line is drawn from the top to the bottom of the drawing sheet.
It takes a lot of practice to draw vertical lines.
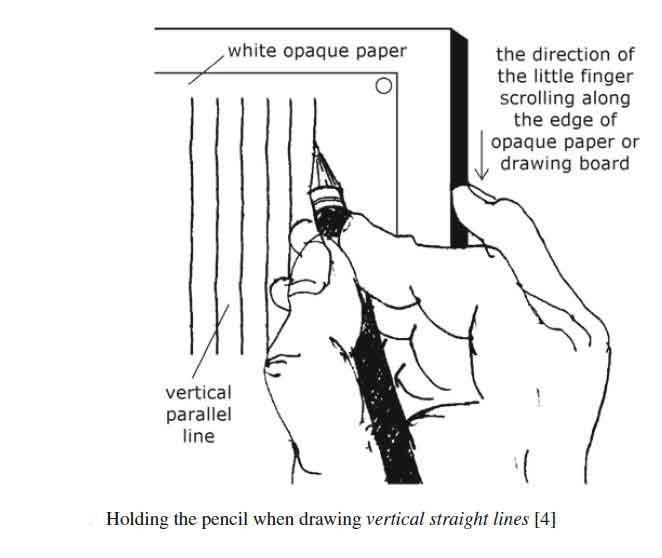
However, you can draw vertical lines using the edge of a paper as a guide and your hand as a scale.
(ii). Sketching of Horizontal Lines.
When sketching horizontal lines, your hand and forearm should turn at the elbow, and the edge of your hand should slide horizontally on the paper.
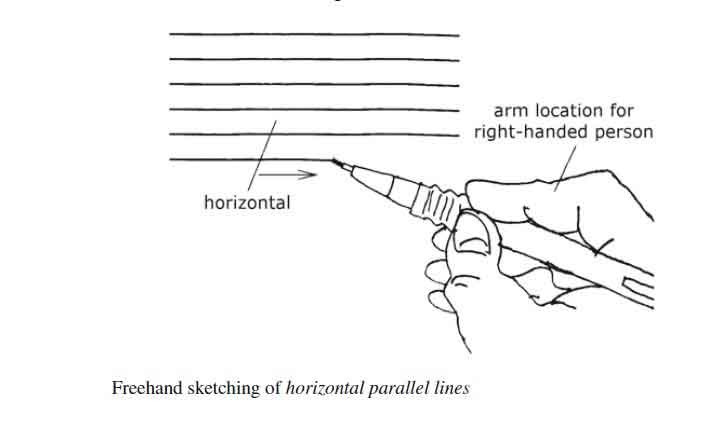
When drawing a horizontal line, you should first try drawing a line in the air to see how the line goes. Then apply a little pressure on the pencil tip and draw a horizontal line lightly.
(iii). Sketching of Oblique Lines.
The oblique lines are drawn from the one corner of the page to the other diagonally.
Usually, the right-handed people draw sloping or oblique lines from the bottom left to the top right of the paper.
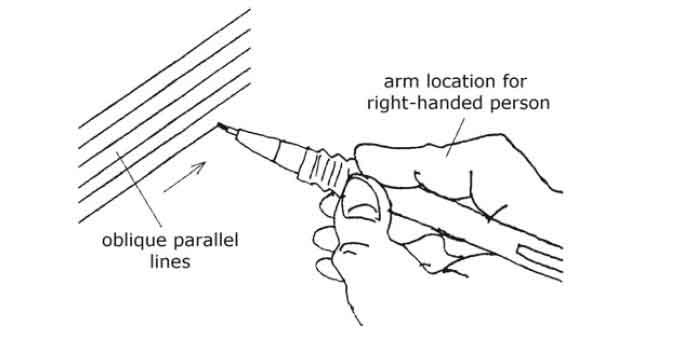
However, the sketching can be made much easier by just rotating the paper into a position where you are going to draw an oblique line.